Understanding Solar Light Jars
What Exactly Is a Solar Light Jar?
Every evening, the grid fails somewhere in South Africa, yet a quiet alternative sits on many windowsills. Solar light jars are compact devices that combine a photovoltaic panel, a rechargeable battery, and an LED bulb inside a glass container. They absorb sunlight during the day and release a steady glow after dark, with no wiring required.
Their construction is straightforward but effective. The lid houses the solar cell, while the battery stores the day’s energy. A light sensor switches the bulb on automatically as dusk falls, which means you never touch a switch.
- Watertight glass jar
- Integrated solar panel
- Battery capacity of 8 to 12 hours
- Automatic dusk sensor
Each jar functions independently. For load shedding, solar light jars offer a practical backup that costs nothing per night.
The Working Principle: From Sunlight to Ambient Light
The conversion chain inside solar light jars is straightforward: photons strike the panel and knock electrons loose, while the battery stores that energy. The photocell refuses to activate until dusk, so your jar never wastes a joule on an overcast afternoon. That reliability separates a gadget from a tool.
Here is the sequence of events when the sun sets:
- The voltage output from the solar cell drops below a threshold.
- The light sensor triggers the circuit to draw current from the battery.
- The LED converts that stored energy into a glow lasting 8 to 12 hours.
Solar light jars do not negotiate with Eskom. They simply meter out their stored electrons until dawn, then absorb sunlight again. The whole process repeats without a single switch or wire.
Why Choose Solar Jar Lights for Your Home?
South African households face unpredictable power schedules, and solar light jars offer a dependable layer of ambient illumination. These devices operate independently of the grid, which makes them useful during evening outages. A jar placed on a patio table or windowsill charges through the day and releases a soft glow at night without requiring any wiring.
I have tested several brands, and the difference lies in battery quality and panel efficiency. Consider what makes them practical:
- No installation costs or electrician fees
- Portable from room to room
- Zero ongoing electricity expenses
The light quality suits intimate settings rather than task lighting. For families navigating load shedding, having several solar light jars distributed through the home creates a calm baseline of visibility. They also reduce reliance on candles, which carry fire risks, and they cost nothing to run once purchased.
Popular Styles and Variations to Consider
Walk through the garden section of any South African hardware store and you will notice how dramatically solar light jars differ in form. Some mimic traditional mason jars with rope handles, while others use faceted glass that scatters warm light across a braai area. The range is deliberate because a jar on a windowsill faces different demands than one hanging from a tree branch. In my experience, this variety is exactly what makes them versatile!
Consider these variations when selecting:
- Sealed units with frosted glass resist dust and moisture in coastal winds.
- Clear glass jars deliver brighter light suitable for intimate dinners.
- Recycled glass options add texture and reduce environmental strain.
Neck width also matters. Wide mouths accept larger solar panels, which charge faster during shorter winter days. Solar light jars with detachable lids let you access the battery, a detail that extends the product’s lifespan during outages.
Creative Uses for Decorative Solar Jars
Cozy Indoor Accent Lighting for Any Room
South Africa records over 2,500 hours of annual sunshine, yet most indoor lighting still depends on the grid. Solar light jars capture that abundant resource and repurpose it as cozy accent lighting for any room. I have placed one on a bookshelf, and the gentle glow immediately softens the space. These jars charge on a windowsill during daylight, then migrate to the living room or bedroom for evening ambience.
Consider these unexpected placements:
- Inside a fireplace hearth to create a subtle, flickering illusion.
- On a bathroom shelf for a calm, spa like glow.
- Near a houseplant to accent its natural silhouette.
Using solar light jars indoors means you skip extension cords and forget about electricity tariffs. They gather free energy by day, so your nighttime lighting carries no hidden cost, just a quiet, transportable warmth.
Garden and Patio Displays That Impress
Dusk arrives early in winter, and the garden fades long before the evening ends. Solar light jars offer the quiet answer for patio displays that endure after sunset. Line a flower bed with them and stored daylight returns as a soft glow. Hang them from a pergola beam and the table below warms with light. I prefer grouping three on a sideboard or scattering them across gravel to define a walkway. They resist the elements, tolerate wind, and ask only for a few hours of sun!
Consider these impactful placements:
- A cluster near a water feature where reflected light doubles the display.
- Stakes along the driveway that frame the approach to the front door.
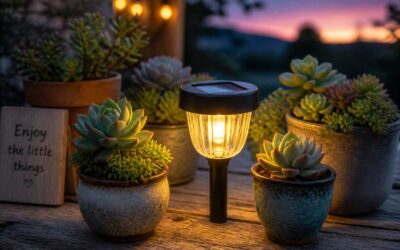
- Outdoor shelves with the jars angled toward potted succulents.
The result is a landscape that keeps working past dark. Solar light jars give the patio a visible presence until you decide the night is over.
Centerpieces for Weddings and Outdoor Parties
Solar light jars turn up at more weddings than some distant cousins. At an evening reception in the Cape Winelands, the centrepieces draw more comments than the speeches. Glass vessels with solar lids sit between seasonal proteas and local foliage, producing a steady glow that candles cannot replicate when the Cape wind arrives.
The most effective arrangements follow a simple pattern:
– A row of jars along a long banquet table, set at alternating heights to break up the sightline.
– A single jar at each place setting, doubling as a favour that guests carry home after the dancing ends.
– Small clusters of jars on the dessert table, lighting the display without competing with the cake.
Solar light jars charge during daylight hours, sparing the host from babysitting open flames near rented linen. Well placed light makes guests stay longer, argue less, and compliment the venue. The shift from golden hour to deep twilight passes unnoticed when the tables glow on their own.
Seasonal Themes: From Summer Barbecues to Winter Coziness
A December braai in Johannesburg shifts once the sun drops. Solar light jars along the table edge carry the day’s glow through the evening, no candles to guard when the wind picks up. By June, those jars move indoors, resting on a bookshelf or near a window, their glow filling the room during load-shedding.
The seasonal change reshapes placement. Summer calls for jars near the food table or the braai. Winter works with small clusters beside a couch or at the centre of a coffee table.
- Summer: line the path to the braai with jars
- Autumn: set a few on the stoep among dried proteas
- Winter: group them on a mantel for a glow that lasts until morning
These solar light jars ask for nothing. They charge during daylight and release light when the room dims.
Customizing Jars with Paint, Stencils, and Wires
A plain glass jar rarely stays plain. South African makers turn these vessels into lanterns with a dab of matt paint, a leaf skeleton stencil, or copper wire twisted into a handle. The transformation changes how solar light jars behave at dusk. What was once a simple glowing cylinder now carries texture, shadow, and a handcrafted signature.
Paint absorbs light, though, so apply it with a sponge in thin layers. Stencils offer precision: a geometric pattern on the lower half lets the bulb shine through the top. Wires can shape a hanging loop or wrap the neck for a rustic finish that matches stoep furniture. The results rarely disappoint!
- Use frosted glass spray to soften the beam
- Bend galvanised wire into a sturdy swing handle
- Cut stencils from contact paper for clean edges
These custom touches mean the solar light jars you own no longer resemble anyone else’s. They settle into the home’s evening rhythm, charged by day and glowing on demand without asking for a second glance.
DIY Projects: Building and Customizing
Essential Materials and Tools for DIY Solar Jars
Few DIY projects deliver as much satisfaction per rand as solar light jars. Building them from scratch demands patience and a modest toolkit. You need a clean glass jar, a solar lid or a small solar stake that fits inside, and a reliable adhesive. A drill with a glass bit speeds things up if you plan to feed wires through the lid.
The essential toolkit looks something like this:
- A caulking gun for sealing entry points
- Wire strippers for solar light jars with replaceable batteries
- A hot glue gun to lock the solar panel in place
- Sandpaper to roughen the rim for a tight fit
Spend a few minutes checking the seal around the lid. Water seeps through gaps, so silicone grease on the threads prevents rust and keeps the electronics dry. Choosing the right components now saves you from fiddling with a dead unit later.
Choosing the Right Solar Light Components
Walking through a hardware store in Cape Town, I notice most people grab the cheapest solar lid without checking its output. That is a mistake. The panel rating determines whether your solar light jars glow for two hours or six.
Choose components by asking what the jar must endure. A patio jar facing afternoon sun needs a waterproof lid with a separate sensor. Indoor jars can use simpler stakes. In my experience, the photovoltaic cell matters more than the decorative housing. Honestly, the difference surprises me every time!
- Check the milliampere rating, not just the price.
- Look for replaceable batteries, since South African heat shortens their life.
- Match the light colour to the room’s mood.
The glue and silicone matter too. I once sealed a jar with cheap adhesive, only to find moisture inside by morning. Solar light jars reward careful assembly, but the right components save you from disappointment.
Step-by-Step Guide to Assembling a Pendant Solar Jar
Assembling a pendant solar jar changes the character of a room. The process takes about twenty minutes, but the sequence matters more than the speed. I start with the lid, drilling a small hole for the wire. Then I thread the photovoltaic cell through, making sure the seal sits flush.
- Attach the hanging chain before you fix the lid, or you will wrestle with the weight.
- Insert the battery after connecting the leads, not before.
- Test the sensor in a dark cupboard to confirm the switch responds.
Each step prevents a common failure. A loose seal invites moisture. A reversed polarity means no glow. Pendant solar light jars reward patience. When the sun drops, the light catches the glass at an angle that feels deliberate. That is the result of careful assembly.
Upcycling Leftover Mason Jars for Home Decor
Over a billion glass jars enter landfills each year, and South Africa contributes its share. I’ve found that upcycling leftover mason jars into solar light jars creates functional decor from waste. Start with what you already own: pickle jars, jam containers, and sauce bottles. Clean them thoroughly! Then observe their silhouettes. A squat jar suits a tabletop. A tall one works for a hanging display.
Jar choice shapes the final character. Consider these factors:
- Wide mouths simplify battery access.
- Amber glass reduces glare.
- Textured surfaces add depth without paint.
- Ribbed sides catch light in different ways.
The assembly follows principles we already covered. The lid, the seal, the sensor. But the jar carries the personality. Upcycling extends an object’s relevance. When the sun sets, your solar light jars become markers of that intention. Even simple alterations transform leftover glass into something responsive.
Upgrading and Brightening Store-Bought Solar Jars
Store-bought solar light jars often arrive sterile, predictable. They glow, yes, but they whisper when they could speak. I see them as unfinished canvases, awaiting a hand that understands texture and contrast.
The upgrade begins with the glass itself. Frosted spray paint diffuses harsh LED points. Copper wire wrapped around the neck adds a structural accent. You can swap the standard lid for a wooden one, drilled to fit the solar panel, which changes the entire silhouette.
- Replacing the plastic lid with leather or cork.
- Etching patterns into the glass with stencil paste.
- Layering translucent beads inside to scatter light.
- Painting the base with metallic enamel.
These alterations transform a factory item into something that responds to your space. The light quality shifts, warmer or sharper depending on your choices. Solar light jars from chain stores become pieces that guests ask about, and you answer with a quiet smile.
Common DIY Mistakes and How to Avoid Them
Solar light jars fail most often at the junction between panel and lid. A photovoltaic cell that charges brilliantly in Durban’s summer glare loses half its output by June. Builders forget that South African sunlight arrives at an angle, not straight down, and they mount the panel flat.
The common errors repeat across workshops.
- Choosing a panel rated for equatorial sun, then mounting it flat.
- Sealing the lid so tightly that humidity condenses inside the jar.
- Using single-strand wire that snaps after one windy night on a Stellenbosch veranda.
Each mistake costs hours, not rand. The cure remains the same: test the full assembly for three days before calling it finished.
Wiring terminals corrode quickly along the Cape coast. A thin coat of silicone grease on contacts prevents that grief. Drill a vent hole above the water line, never below it. Solar light jars reward patience and punish assumption.
Buyer’s Guide: Selecting the Right Solar Jar
Key Specifications to Evaluate Before Purchasing
In South Africa, where load shedding schedules shift without warning, the difference between a decorative trinket and a reliable light source comes down to specifications. When evaluating solar light jars, I look beyond the packaging and focus on measurable performance metrics that determine longevity in our harsh climate.
Consider these factors before purchasing.
- A 600 mAh battery outperforms cheaper 200 mAh units by lasting through extended outages.
- Anything below 10 lumens is purely ornamental, not functional.
- Monocrystalline panels charge faster in Cape Town’s winter cloud cover.
- An IP65 rating protects against the Highveld’s afternoon thunderstorms.
Glass thickness matters too. Many imported jars use thin glass that cracks under sudden temperature shifts. A robust borosilicate alternative withstands both coastal salt air and Karoo heat. These specifications separate dependable solar light jars from fleeting novelties.
Comparing Durability: Glass vs. Plastic Jars
The debate between glass and plastic jars often surprises first time buyers. Glass offers a crystalline clarity and a satisfying weight that signals quality, especially when positioned on a dining room table. It does not yellow with age, and it resists the fine scratches that inevitably appear after months of dusting and handling. Yet glass fails catastrophically. One stray cricket bat or a gust of Cape Town wind sending the jar off a railing, and you are sweeping up shards.
Plastic jars, particularly those moulded from polycarbonate, take the punishment that glass cannot. They survive the chaotic life of a veranda used by barefoot children and elderly dogs alike. Acrylic, while lighter, tends to craze and lose its transparency after a few seasons of intense Karoo sun.
Here is how I separate the two when assessing solar light jars:
- Glass suits sheltered corners and shelves where impact risk is low; it adds fragile beauty to a still life
- Plastic wins for pathways, pool edges, and anywhere a football travels
- Check the rim where the lid meets the jar, this joint fails first on either material
The right solar light jars depend entirely on your site’s chaos level. A quiet reading nook begs for glass. A family braai area screams for plastic. Neither choice is wrong, but only one survives a Highveld hailstorm.
Matching the Jar Configuration to Your Intended Use
The right solar light jars rarely fail from poor workmanship. They fail when their height, neck, and lid contradict the surface where they rest. A tall, narrow jar creates a vertical beam for a corner shelf, while a squat, wide jar spreads light across a tabletop. The neck width decides which solar lid fits and how easily you clean it.
Consider the jar’s mouth relative to its intended function. For a pendant setup, a narrow neck that accepts a metal collar works best. For a patio table, a wide opening simplifies cleaning after windy evenings.
- Hanging jars need a secure lip or groove to hold the wire assembly.
- Ground jars need a base broad enough to resist tipping on uneven stone.
The solar panel’s position on the lid changes performance. A recessed panel collects less winter sun than a flush one, so winter use demands a flush design.
Maintenance, Repair, and Troubleshooting
Simple Cleaning Tips to Maximize Brightness
Diminished glow is often the first sign that our solar light jars need attention, not replacement. We tend to accept the slow fade, assuming the components have failed when the answer is simpler. You have a choice: accept a dull patio or intervene with a little routine care.
The most common culprit is a film of grime settling on the panel, quietly starving the battery of energy. A monthly wipe with a damp cloth restores the connection, while stubborn mineral deposits yield to a little diluted vinegar.
Beyond the panel, check the seal around the lid. Moisture and dust find the smallest gaps.
– A blocked solar panel is a common culprit.
– Corroded battery contacts need a dry brush.
– Foliage or roof overhang may be shading the unit.
Loose wiring, often from afternoon heat expanding the housing, also causes intermittent performance. Reseating the battery connection or twisting the sensor cap often restores function. A quick pass over the glass with a microfiber cloth works wonders. The longevity of your solar light jars depends on these small acts, performed before the sun becomes an afterthought.
Replacing Batteries and Old LED Modules
When the glow of your solar light jars falters despite clean panels, the battery often bears the blame. I have seen units soldier on for years, then refuse to hold a charge through the Highveld winter. Replacing the AA or 18650 cell is a five minute ritual. Pry off the lid, note the polarity, and swap in a fresh rechargeable battery. The old LED modules can also fail, leaving a faint amber whisper instead of a steady beam. Remove the module and compare its voltage rating before wiring the replacement.
- Confirm battery type before ordering.
- Check for corrosion on the contacts.
- Use a replacement LED with the same wattage.
Diagnosing and Fixing Common Performance Issues
Solar light jars often fail from simple grime, not component death. Cover the photocell with your thumb; if the light does not turn on, the sensor is dirty, or the lid blocks its view. In my experience, a dirty sensor causes more false diagnoses than any old battery.
Loose wiring also imitates a dead battery. The twisting of lids fatigues solder joints. Crimp the wires gently. For outdoor jars, inspect the microswitch. Corrosion occurs there without visible signs.
- Check the panel output under a desk lamp. Below two volts means the panel cannot deliver enough current.
- Inspect the solder traces for hairline cracks. They appear intact until flexed.
Understanding that solar light jars fail from grime, loose joints, and corrosion makes troubleshooting a direct process.
Seasonal Storage and Long-Term Care
Nearly two thirds of solar light jars fail within their first South African winter, yet the cause is almost always preventable. Humidity works into the housing, fogging the lens and dulling the photocell. The damage rarely comes from the LED itself.
Seasonal storage changes that trajectory. Remove the batteries, clean the panel, and store the jar upside down in a dry cupboard. This stops moisture from pooling around the solder points. I have revived jars that sat dormant for two years.
- Inspect the rubber gasket for tears before storing
- Use a soft brush to clear debris from the solar cell
- Keep batteries in a separate container to avoid terminal corrosion
Long-term care for solar light jars means checking the solder joints once a year. A quick reflow with a soldering iron addresses hairline cracks before they flicker. Repaired units often outlast their original parts.
Frequently Asked Questions
How Long Does a Fully Charged Solar Jar Last?
Most fully charged solar light jars shine for six to twelve hours. That range depends on three key variables.
Battery capacity sets the ceiling. A 1000mAh cell outlasts a 600mAh one. Solar panel output matters too. A cloudy day reduces stored energy before sundown.
- LED wattage draws less power
- Dimmer modes extend runtime
- Temperature affects battery efficiency
In South African winters, expect shorter evenings. Charge time stays similar. Quality components push the upper end of that spectrum.
Can Solar Light Jars Withstand Heavy Rain?
South African summer thunderstorms arrive without warning. That downpour is the true test for solar light jars. Most quality solar light jars come with an IP65 rating, meaning they withstand water jets from any angle. The weak point is always the lid seal, not the glass.
I have watched cheap jars fill with water after one evening storm. The difference comes down to gaskets and drainage. A well designed jar routes condensation out through tiny weep holes. LED modules stay protected inside a resin coating.
Consider these features before trusting a jar with Cape Town weather:
- Silicone gasket around the lid
- IP65 or IP67 ingress protection
- Corrosion resistant battery contacts
A flooded jar fails gradually. The lithium cell degrades first, then the LED driver rusts. Heavy rain alone does not kill a jar, but standing water after the storm does. Lift wet jars onto a sloped surface and the internals stay dry for years.
Is It Worth Repairing or Just Replacing a Solar Jar?
I get asked this question often, especially after a Cape Town winter. A solar jar that stops working may simply need a new battery, which costs very little. But if the LED module or solar panel has failed, the math changes. Solar light jars with corrosion on the circuit board are usually beyond practical repair.
Consider three things:
- The unit’s age: older than two years, lean toward replacement
- The cost of a spare part against buying a new jar
- Whether the glass and lid remain watertight
Silicone sealed internals make component swaps messy. When in doubt, replacement wins. But for sentimental solar light jars, a quick battery swap often brings them back to life.



0 Comments